Here's how to cross compile driver for Mediatek MT7601 based wifi dongle.
Before this, you need to compile your own raspibian kernel, see my old post:
http://igunosystem.blogspot.co.id/2014/03/step-by-step-building-raspibian-on.html
After above process is OK, You'll have compiled kernel source and working root file system with working chroot (using qemu-arm-static) for raspberry pi board on your Desktop PC.
mt7601
download source:
https://github.com/porjo/mt7601/archive/master.zip
or
git clone https://github.com/porjo/mt7601.git
Showing posts with label Embedded. Show all posts
Friday, October 30, 2015
RTL8188eu on Raspberry pi
Here's how to cross compile driver for RTL8188eu based wifi dongle
Before this, you need to compile your own raspibian kernel, see my old post:
http://igunosystem.blogspot.co.id/2014/03/step-by-step-building-raspibian-on.html
After above process is OK, You'll have compiled kernel source and working root file system with working chroot (using qemu-arm-static) for raspberry pi board on your Desktop PC.
download source:
https://github.com/lwfinger/rtl8188eu/archive/master.zip
or
git clone https://github.com/lwfinger/rtl8188eu
Before this, you need to compile your own raspibian kernel, see my old post:
http://igunosystem.blogspot.co.id/2014/03/step-by-step-building-raspibian-on.html
After above process is OK, You'll have compiled kernel source and working root file system with working chroot (using qemu-arm-static) for raspberry pi board on your Desktop PC.
download source:
https://github.com/lwfinger/rtl8188eu/archive/master.zip
or
git clone https://github.com/lwfinger/rtl8188eu
Wednesday, October 21, 2015
WVDIAL Keep Alive
Here's a script to make the wvdial keep alive. Similar to umtskeeper that use sakis3g, this one can be use for some modem or internet provider that sakis3g won't connect. let's call this script as runwvd.
runwvd: (moved to github)
https://github.com/huntu2/wvdial-keepalive/blob/master/runwvd
make the script executable
chmod a+x runwvd
change the MODEM_NAME to your modem vendor that shown by lsusb
To start do following:
sudo ./runwvd start
To stop:
sudo ./runwvd stop
To view progres:
tail -f /tmp/runwvd.log
Prerequisites:
Before above script able to run properly, you'll need package:
sudo apt-get install wvdial usb-modeswitch fping ppp nohup usbutils
configure wvdial.conf by executing
sudo wvdialconf
copy the result at /etc/wvdial.conf and place it in the same folder as this script. Complete the Phone number username and password, something like this
wvdial.conf:
#-----------------------------------------------
[Dialer Defaults]
Init1 = ATZ
Init2 = ATQ0 V1 E1 S0=0 &C1 &D2
Modem Type = Analog Modem
ISDN = 0
Modem = /dev/ttyUSB0
Baud = 9600
Phone = *99#
Username = '0'
Password = '0'
#------------------------------------------------
the '0' means no username and password supplied.
You also need resetusb, here's the source:
resetusb.c
#----------------------------------------------------
#include <stdio.h>
#include <fcntl.h>
#include <errno.h>
#include <sys/ioctl.h>
#include <linux/usbdevice_fs.h>
void main(int argc, char **argv)
{
const char *filename;
int fd;
filename = argv[1];
fd = open(filename, O_WRONLY);
ioctl(fd, USBDEVFS_RESET, 0);
close(fd);
return;
}
#----------------------------------------------------
compile it using:
gcc -o resetusb resetusb.c
Brief how it works:
The runwvd start with stamp file (/tmp/.runwvd) to control the loop, if this file gone, the loop will stop and the script terminated. The output process can be shown at /tmp/runwvd.log and the wvdial progress can be monitored from /tmp/wvdial.log.
First, it will call wvdial with wvdial.conf at the same folder. Then every SLEEPTIME period (above is 3 second) will regularly check for ppp0 existence and wvdial process. If both is missing, then the script will kill the wvdial and redial again.
Second, if first step is passed , the script will try to ping the dns server on peride CHECKTIME x SLEEPTIME, (above every 3x60=3minutes). The IP of the DNS were taken from /etc/resolv.conf resulted by wvdial upon successful connection. The ping loop will try to reach the DNS server for PINGLIMIT times (above is 5) with 1 second delay each. If all fail, then the script will terminate the wvdial and redial again.
Third, if the redial process happen more than REDIALIMIT (above is 5 times), then the script will try to reset the 3G modem after the wvdial terminated, and then redial again. This will help to re-register the 3G modem to the mobile network base station.
This note was written for my own record continuing previous blog on my homemade 3g router, but this might be useful for others who need it.
Sorry for the bad blog format due to my poor knowledge of the HTML and english language.
runwvd: (moved to github)
https://github.com/huntu2/wvdial-keepalive/blob/master/runwvd
make the script executable
chmod a+x runwvd
change the MODEM_NAME to your modem vendor that shown by lsusb
To start do following:
sudo ./runwvd start
To stop:
sudo ./runwvd stop
To view progres:
tail -f /tmp/runwvd.log
Prerequisites:
Before above script able to run properly, you'll need package:
sudo apt-get install wvdial usb-modeswitch fping ppp nohup usbutils
configure wvdial.conf by executing
sudo wvdialconf
copy the result at /etc/wvdial.conf and place it in the same folder as this script. Complete the Phone number username and password, something like this
wvdial.conf:
#-----------------------------------------------
[Dialer Defaults]
Init1 = ATZ
Init2 = ATQ0 V1 E1 S0=0 &C1 &D2
Modem Type = Analog Modem
ISDN = 0
Modem = /dev/ttyUSB0
Baud = 9600
Phone = *99#
Username = '0'
Password = '0'
#------------------------------------------------
the '0' means no username and password supplied.
You also need resetusb, here's the source:
resetusb.c
#----------------------------------------------------
#include <stdio.h>
#include <fcntl.h>
#include <errno.h>
#include <sys/ioctl.h>
#include <linux/usbdevice_fs.h>
void main(int argc, char **argv)
{
const char *filename;
int fd;
filename = argv[1];
fd = open(filename, O_WRONLY);
ioctl(fd, USBDEVFS_RESET, 0);
close(fd);
return;
}
#----------------------------------------------------
compile it using:
gcc -o resetusb resetusb.c
Brief how it works:
The runwvd start with stamp file (/tmp/.runwvd) to control the loop, if this file gone, the loop will stop and the script terminated. The output process can be shown at /tmp/runwvd.log and the wvdial progress can be monitored from /tmp/wvdial.log.
First, it will call wvdial with wvdial.conf at the same folder. Then every SLEEPTIME period (above is 3 second) will regularly check for ppp0 existence and wvdial process. If both is missing, then the script will kill the wvdial and redial again.
Second, if first step is passed , the script will try to ping the dns server on peride CHECKTIME x SLEEPTIME, (above every 3x60=3minutes). The IP of the DNS were taken from /etc/resolv.conf resulted by wvdial upon successful connection. The ping loop will try to reach the DNS server for PINGLIMIT times (above is 5) with 1 second delay each. If all fail, then the script will terminate the wvdial and redial again.
Third, if the redial process happen more than REDIALIMIT (above is 5 times), then the script will try to reset the 3G modem after the wvdial terminated, and then redial again. This will help to re-register the 3G modem to the mobile network base station.
This note was written for my own record continuing previous blog on my homemade 3g router, but this might be useful for others who need it.
Sorry for the bad blog format due to my poor knowledge of the HTML and english language.
Sunday, October 18, 2015
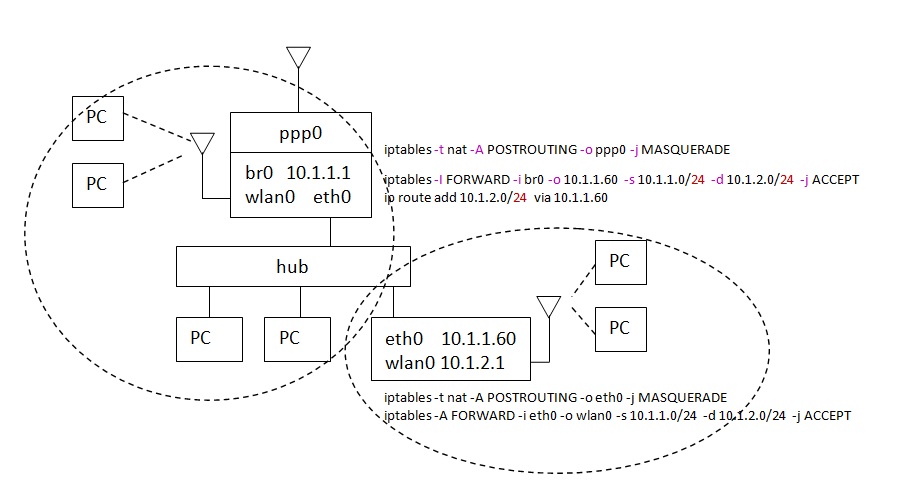
Routing subnet below net
iptables -t nat -A POSTROUTING -o ppp0 -j MASQUERADE
iptables -I FORWARD -i br0 -o 10.1.1.60 -s 10.1.1.0/24 -d 10.1.2.0/24 -j ACCEPT
ip route add 10.1.2.0/24 via 10.1.1.60
iptables -t nat -A POSTROUTING -o eth0 -j MASQUERADE
iptables -A FORWARD -i eth0 -o wlan0 -s 10.1.1.0/24 -d 10.1.2.0/24 -j ACCEPT
Thursday, August 20, 2015
Running Xorg From rc.local as common user
To start Xserver with no desktop manager at boot time and run as common user, simply put this line at /etc/rc.local
setsid sh -c 'su -c startx username <> /dev/tty1 >&0 2>&1' &
Replace the startx with your Xserver application such as startxfce, startlxde etc.
In my system i want to run the xterm on 1024x768 monitor with whole area active, no need mouse moved to active xterm area, says the geometri of xterm to cover whole area would be 170x59 character size, the command became:
setsid sh -c 'su -c "xinit -geometry 170x59" username <> /dev/tty1 >&0 2>&1' &
Ref: http://unix.stackexchange.com/questions/146758/how-do-i-run-as-a-limited-user-while-logged-in-as-root-and-another-question
setsid sh -c 'su -c startx username <> /dev/tty1 >&0 2>&1' &
Replace the startx with your Xserver application such as startxfce, startlxde etc.
In my system i want to run the xterm on 1024x768 monitor with whole area active, no need mouse moved to active xterm area, says the geometri of xterm to cover whole area would be 170x59 character size, the command became:
setsid sh -c 'su -c "xinit -geometry 170x59" username <> /dev/tty1 >&0 2>&1' &
Ref: http://unix.stackexchange.com/questions/146758/how-do-i-run-as-a-limited-user-while-logged-in-as-root-and-another-question
VIm Cheatsheet
Cursor movement
h - move cursor left
j - move cursor down
k - move cursor up
l - move cursor right
w - jump forwards to the start of a word
W - jump forwards to the start of a word (words can contain punctuation)
e - jump forwards to the end of a word
E - jump forwards to the end of a word (words can contain punctuation)
b - jump backwards to the start of a word
B - jump backwards to the start of a word (words can contain punctuation)
0 - jump to the start of the line
^ - jump to the first non-blank character of the line
$ - jump to the end of the line
G - go to the last line of the document
5G - go to line 5
Tip Prefix a cursor movement command with a number to repeat it. For example, 4j moves down 4 lines.
h - move cursor left
j - move cursor down
k - move cursor up
l - move cursor right
w - jump forwards to the start of a word
W - jump forwards to the start of a word (words can contain punctuation)
e - jump forwards to the end of a word
E - jump forwards to the end of a word (words can contain punctuation)
b - jump backwards to the start of a word
B - jump backwards to the start of a word (words can contain punctuation)
0 - jump to the start of the line
^ - jump to the first non-blank character of the line
$ - jump to the end of the line
G - go to the last line of the document
5G - go to line 5
Tip Prefix a cursor movement command with a number to repeat it. For example, 4j moves down 4 lines.
Frame Buffer Set on Banana Pi
When you plug the HDMI of Banana Pi running Bananian to low resolution TV or Monitor, you won't get proper display. To correct this use the frame buffer setting,
sudo apt-get install fbset
Replace the /etc/fb.modes, fill it with these lines:
mode "640x480-60"
# D: 25.200 MHz, H: 31.500 kHz, V: 60.001 Hz
geometry 640 480 640 960 32
timings 39682 48 16 33 10 96 2
rgba 8/16,8/8,8/0,8/24
endmode
mode "768x576-75"
# D: 49.188 MHz, H: 46.580 kHz, V: 75.008 Hz
geometry 768 576 768 1152 32
timings 20330 128 32 32 8 128 5
accel true
rgba 8/16,8/8,8/0,8/24
endmode
sudo apt-get install fbset
Replace the /etc/fb.modes, fill it with these lines:
mode "640x480-60"
# D: 25.200 MHz, H: 31.500 kHz, V: 60.001 Hz
geometry 640 480 640 960 32
timings 39682 48 16 33 10 96 2
rgba 8/16,8/8,8/0,8/24
endmode
mode "768x576-75"
# D: 49.188 MHz, H: 46.580 kHz, V: 75.008 Hz
geometry 768 576 768 1152 32
timings 20330 128 32 32 8 128 5
accel true
rgba 8/16,8/8,8/0,8/24
endmode
Wednesday, August 12, 2015
Linux FIle & Media Server
I had several external usb hardisk. I need to bring them along with my laptop when needed. I though why not create a file server, so that i can still access it anywhere at home. Utilizing one of the cubieboard, i create this file server.
Samba Server
sudo apt-get install samba cifs-utils ntfs-3g dosfstools
add these lines at the end of /etc/samba/smb.conf
[media]
path = /media
public = yes
writable = yes
comment = smb share
printable = no
guest ok = yes
read only = no
directory mask = 0777
Samba Server
sudo apt-get install samba cifs-utils ntfs-3g dosfstools
add these lines at the end of /etc/samba/smb.conf
[media]
path = /media
public = yes
writable = yes
comment = smb share
printable = no
guest ok = yes
read only = no
directory mask = 0777
Tuesday, August 11, 2015
Homemade 3G Router/APCombo
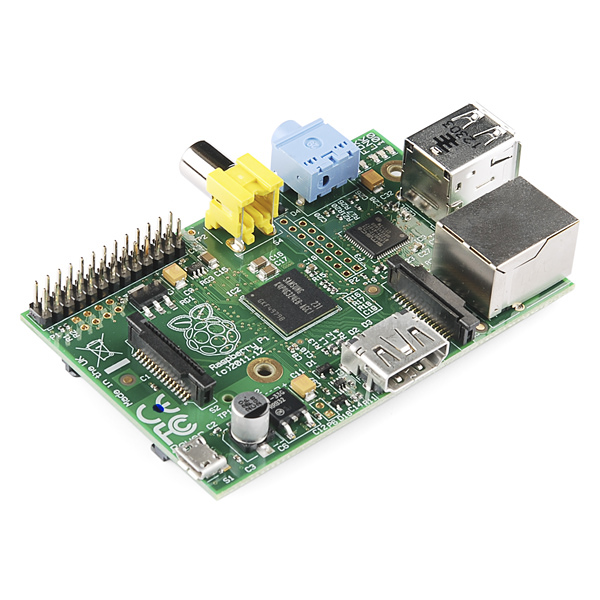
This article show you how to make your own 3g router using embedded linux, in my case i'm using a raspberry pi 1 Model B. What you need other then the board it self were 3g modem and wifi dongle. The Wifi dongle that were gonna use, should have multiple tx queue features, one from atheros should do the trick.
Ethernet/LAN was bridged with Wifi. In this way client via ethernet can also connected to the network. The bridge hold the system ip address, and no ip assigned to ethernet or wifi.
3G connection were done by umtskeeper which include sakis3g, AP were done by hostapd working along with dnsmasq for dhcp and brigde util to configure the network bridge.
Ethernet/LAN was bridged with Wifi. In this way client via ethernet can also connected to the network. The bridge hold the system ip address, and no ip assigned to ethernet or wifi.
3G connection were done by umtskeeper which include sakis3g, AP were done by hostapd working along with dnsmasq for dhcp and brigde util to configure the network bridge.
Friday, August 7, 2015
Media Player On Allwinner device.
This is my note to make media player that work on Cubieboard, Bananapi and other allwinner board. Assume you already had a working debian wheezy system running on the board.
Add these repository:
sudo vi /etc/apt/source.list
deb http://dl.bananian.org/packages/ wheezy main
deb http://packages.cubian.org/ wheezy main non-free
Add gpg key:
wget -O - http://packages.cubian.org/cubian.gpg.key | sudo apt-key add -
wget -O - http://dl.bananian.org/packages/bananian-packages.key | sudo apt-key add -
Add these repository:
sudo vi /etc/apt/source.list
deb http://dl.bananian.org/packages/ wheezy main
deb http://packages.cubian.org/ wheezy main non-free
Add gpg key:
wget -O - http://packages.cubian.org/cubian.gpg.key | sudo apt-key add -
wget -O - http://dl.bananian.org/packages/bananian-packages.key | sudo apt-key add -
Thursday, March 13, 2014
Build Raspibian Linux
I'm gonna share how to create debian system on Raspberry PI rev B.

1. Cross-toolchains
Download the toolchains from https://github.com/raspberrypi/tools/archive/master.zip
extract somewhere in your home directory, mostly people put the toolchains on /opt directory.
Export the toolchains path to your working environment like this:
export PATH:$PATH:
test your toolchains by typing:
arm-linux-gnueabihf-gcc --version
Monday, December 9, 2013
Compat wireless driver on mini2440
Continuing my post on Debian squeeze in mini2440 board , the default wireless driver included in kernel 2.6.32.2 are limited and most of them were discontinued.
As posted before, get the toolchains from debian squeeze distribution and kernel source for mini2440 whith 2.6.32.2 version.
Get the latest compat wireless driver from linuk backports.
I use the compat-drivers-3.7.6-1.tar.bz2 from http://mirror.anl.gov/pub/linux/kernel/projects/backports/stable/v3.7.6/compat-drivers-3.7.6-1.tar.bz2
Continuing my post on Debian squeeze in mini2440 board , the default wireless driver included in kernel 2.6.32.2 are limited and most of them were discontinued.
As posted before, get the toolchains from debian squeeze distribution and kernel source for mini2440 whith 2.6.32.2 version.
Get the latest compat wireless driver from linuk backports.
I use the compat-drivers-3.7.6-1.tar.bz2 from http://mirror.anl.gov/pub/linux/kernel/projects/backports/stable/v3.7.6/compat-drivers-3.7.6-1.tar.bz2
Friday, June 14, 2013
Debian Squeeze in mini2440 board
Toolchains:
Get base debian build essential and ncurses for menuconfig
>sudo apt-get install build-essential ncurses-dev
add to /etc/apt/sources.list
deb http://emdebian.org/debian/ squeeze main
> sudo apt-get update
> sudo apt-get install gcc-4.3-arm-linux-gnueabi
check toolchains
> arm-linux-gnueabi-gcc --version
arm-linux-gnueabi-gcc (Debian 4.3.5-4) 4.3.5Copyright (C) 2008 Free Software Foundation, Inc.
This is free software; see the source for copying conditions. There is NO
warranty; not even for MERCHANTABILITY or FITNESS FOR A PARTICULAR PURPOSE.
Toolchains:
Get base debian build essential and ncurses for menuconfig
>sudo apt-get install build-essential ncurses-dev
add to /etc/apt/sources.list
deb http://emdebian.org/debian/ squeeze main
> sudo apt-get update
> sudo apt-get install gcc-4.3-arm-linux-gnueabi
check toolchains
> arm-linux-gnueabi-gcc --version
arm-linux-gnueabi-gcc (Debian 4.3.5-4) 4.3.5Copyright (C) 2008 Free Software Foundation, Inc.
This is free software; see the source for copying conditions. There is NO
warranty; not even for MERCHANTABILITY or FITNESS FOR A PARTICULAR PURPOSE.
Thursday, March 22, 2012
Android mini2440 W35
Android on FriendlyARM Mini2440 with W35 LCD
I got mini2440 board from FriendlyARM with W35 LCD (320x240) and I want to run Android at this board. The FriendlyARM Download site provide only android for mini2440 with T35 LCD ported by shinlek. If you force to use it, the display and touchscreen will not work well because the screen become rotated 90', this is caused by the width and depth are not match. we need to adjust the kernel to make it work correctly.
Tuesday, August 24, 2010
Artila MSM-4S on Alix3d2 running embedded linux
This post explain how to install the MSM-4S miniPCI Serial board on Alix3d2 board running embedded linux.
Before Continue, This post were build based on my earlier post which titled Embedded Linux on Alix3d2 board PC Engines.
Assume you had succesfully build the linux on the board. The serial card detected as 8250 standard uart but somehow at regular kernel the ttySx will not work as usual, you may find that the board undeteted or even if detected the baudrate will not work as setting, definitely the kernel need tobe modified. There wasn't much support information about driver in linux. Thank's to Frank Rysanek who build the driver for linux.
Artila MSM-4S
This post explain how to install the MSM-4S miniPCI Serial board on Alix3d2 board running embedded linux.
Before Continue, This post were build based on my earlier post which titled Embedded Linux on Alix3d2 board PC Engines.
Assume you had succesfully build the linux on the board. The serial card detected as 8250 standard uart but somehow at regular kernel the ttySx will not work as usual, you may find that the board undeteted or even if detected the baudrate will not work as setting, definitely the kernel need tobe modified. There wasn't much support information about driver in linux. Thank's to Frank Rysanek who build the driver for linux.
Artila MSM-4S
Friday, July 9, 2010
Embedded Linux for Intel IXP425 using Avila Gateworks Board
Avila Gateworks GW2348-4
Intel IXP425 was a network processor, I'm using Avila Gateworks GW2348-4 at my company during the development of first version of wimax project at the year of 2006. This is my first project using embedded linux. Main tools used were buildroot with kernel 2.4 patched by timesys along with its toolchain. It's not a free ones so not many explanation available at that time. These day I had success recreated a free source code using kernel 2.6 with some modifitacation that i took from avila BSP and I manage to add atheros wifi device driver support for the kernel and madwifi application at the buildroot.
Introduction to Embedded System using Zoom ColdFire M5474LiteKit Development Board
Zoom ColdFire M5474LiteKit Development Board
Here's captured slide how to build linux image for the board
(15)
This was taken from a training session I held at the LIPI Bandung back at the October 2009, the course were building embedded linux on Zoom ColdFire M5474LiteKit Development Board with major problem occurred due to the lack of the flash size and inactive compact flash adapter by default. I don't know the reason why Freescale or Logic-PD doesn't activate the compact flash by default at shipment. I've been trough alot of process getting binary for PLD to make the compact flash slot active. After i got it, one last thing i forgot, idon't have a jtag adapter to dowload it, bah!. Any way after all i've try to make the board work via NFS, and finished. Then i made a presentation to LIPI people on their project using this board. You may also download the copy of the presentation here.
Here's captured slide how to build linux image for the board
(15)
Wednesday, July 7, 2010
Embedded Linux on Alix3d2 board PC Engines
ALIX3D2 BOARD

PC Engines ALIX3D2 Board is low cost embedded system based on i386 AMD Geode LX800.
My company purchased at the cost arround 100$, quite cheap compared to arm based embedded with the same features, also amd geode had encryption engine for networking support.

Subscribe to:
Posts (Atom)