PC Engines ALIX3D2 Board is low cost embedded system based on i386 AMD Geode LX800.
My company purchased at the cost arround 100$, quite cheap compared to arm based embedded with the same features, also amd geode had encryption engine for networking support.
My company purchased at the cost arround 100$, quite cheap compared to arm based embedded with the same features, also amd geode had encryption engine for networking support.


There are many precompiled linux, ready to deploy, such as voyage linux.
But for developer who needs complete source code in order to configure and add your own devices driver and application we may use buildroot, a favorite one on building debian linux for embedded system.
But for developer who needs complete source code in order to configure and add your own devices driver and application we may use buildroot, a favorite one on building debian linux for embedded system.
Main Features of ALIX3D2 Board:
| • CPU: 500 MHz AMD Geode LX800 • DRAM: 256 MB DDR DRAM • Storage: CompactFlash socket, 44 pin IDE header • Power: DC jack or passive POE, min. 7V to max. 20V • Three front panel LEDs, pushbutton • Expansion: 2 miniPCI slots, LPC bus • Connectivity: 2 Ethernet channels (Via VT6105M 10/100) • I/O: DB9 serial port, dual USB port • Board size: 6 x 6" (152.4 x 152.4 mm) - same as WRAP.1E • Firmware: tinyBIOS |
Source version during buildroot compilation can be a tricky, not every combination can be compiled succesfully, sometimes they miss linked. They are the version of the buildroot itself, kernel, gcc, bin utils and uclibc. You might try some combination for many diferent version of the source and wait long enough to see the pain result.
For the host linux i'm using opensuse 11, with kernel development option checked during installation. You will need the texinfo downgrade using yast from installed one (ver 4.11) to texinfo version 4.5. Mine using fedora texinfo 4.5 rpm and it work well. For other host environment you should check the texinfo version.
Version combination of the source:
buildroot-2009.02.tar.gz
linux-2.6.21.5.tar.bz2
gcc-4.2.4.tar.bz2
binutils-2.17.tar.bz2
uClibc-0.9.29.tar.bz2
Besides those files, you still need internet connection to download the rest of the needed files. Buildroot will create the image of root files system and the toolchain produced will be used to compile the kernel. After both sucessfully build and written to compact flash, you still need a linux live cd to install grub loader in order to make the compact flash bootable. I'm using puppy linuxc 4.12 and work well.
COONFIGURING BUILDROOT
Download and untar the buildroot package, run as non-root by typing "make menuconfig"
 select "target options" -> check "Show package that deprecated or obsolote"
this will show some old version package that considered deprectaced but still can be use
 Exit and select "Toolchain", set Kernel header using "linux-2.6.21.5", "uClibc 0.9.29", "binutils-2.17" and "gcc 4.2.4", you may also check "build/install c++ compiler and libstdc++" for php and sql application that widely use for common web base needed.

Select "Package selection for the target". Select the busy box selection to "busybox-1.13.x", this version proven to be successfully compiled with the above source code version.

Since our target is compact flash, the "target filesystem option" by default is using ext2. Leave it checked.

To enable boot we need grub loader. Check the grub option at the bottom of the filesystem option.

Exit and save the new config file. You may browse and add more linux function at the "Package selection for the target" later after the toolchain succesfully build.
exit to shell and type "make". Buildroot will start to compile and download files as needed.
If the compilation were succes, then you will have file and folders:
exit to shell and type "make". Buildroot will start to compile and download files as needed.
If the compilation were succes, then you will have file and folders:
- ./binaries/uclibc/rootfs.i686.ext2 -> image file system
- ./build_i686/staging_dir/usr/bin/ -> toolcahin set that we'll gone use to build kernel
These file system image were not complete yet, but we will need those produced files for our complete system. Next step we will compile the kernel source.
LINUX KERNEL COMPILATION
For the linux kernel configuration, i personally thank Mr. David at his post about configuring the kernel for Alix 2.
Let's begin copy the downloaded kernel source at ./buildroot-2009.02/dl/linux-2.6.21.5.tar.bz2 and untar it. Before start the compilation, we need to point the toolchain the one that produced by buildroot, these will point the library to the one that installed on the created file system produced by buildroot.
For these purposes, i created a short script at linux kernel directory as follow, remember to replace
#> cd linux-2.6.21.5#> vi makecustom
press "i" to insert character, type in lines below:
export PATH=$PATH:
make $1 $2 $3 CROSS_COMPILE=i686-linux-uclibc-
press ":" follow by presseing "wq" to write and exit the vi editor
next make the files executables as follow
#> chmod a+x makecustom
To start the configuring the kernel source, type in
#> ./makecustom menuconfig
This will show you the menu for the linux kernel configuration.

 Uncheck the "HPET timer support" since AMD Geode doesn't have it.

exit to higher menu level, select the "Bus options (PCI, PCMCIA, EISA, MCA, ISA)"check " NatSemi SCx200 support" & " NatSemi SCx200 27MHz High-Resolution Timer Suppor"

Exit to higher level, then select "Device Driver", this part were the most important since there are many configuration that can be add or remove and many part might need modification to meet the board design and your custom needs.

IDE chipset-> select "ATA/ATAPI/MFM/RLL support" check the "AMD CS5535 chipset support "
 exit to higer level, select the " Serial ATA (prod) and Parallel ATA (experimental) drivers", also check " CS5535 PATA support (Experimental)"
 Exit to higer menu level, select "Network Device Support"-> "ethernet (10 or 100mbit)" -> check "EISA, VLB, PCI and on board controllers "
and "VIA Rhine support "
 exit to higher menu level, select "I2C support"->"I2C Hardware Bus support" -> select "Geode ACCESS.bus support"
exit to higher level, select the " Hardware Monitoring support" check the " National Semiconductor LM90 and compatible"
 Disable any graphics support, exit to higher menu level, select "Graphics support" un check everything.
 Clear all sound support, exit to higher menu level, select "Sound", un check everything
 Exit to higher menu level, select the "usb support" -> check for "host side usb" & "EHCI HCD (USB2.0)" support.
 The board had led device, then exit to higher menu level, select "LED Devices", check led support. Later on you will need to modifies the led source t meet requirement
 Disable RTC support, exit to higher level, select "Real Time Clock", unchecked everything
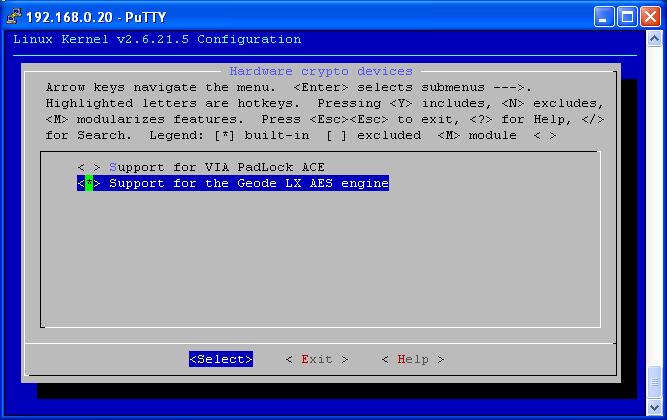
Go to upper menu level out side the device driver, the Geode had an encryption engine, to enable it select "Cryptographic options" -> "hardware crypto device" -> check "Support for the Geode LX AES engine"
We done trough the basic kernel configuration, exit and save the configuration.
To Starting Compile the kernel, in the linux kernel, call the created script follow by "all"
To Starting Compile the kernel, in the linux kernel, call the created script follow by "all"
#> ./makecustom all
The kernel will start compiling using toolchain produced by buildroot. It took a while and the result will located at ./linux-2.6.21.5/arch/i386/boot/bzImage.
Next we need to create modules to be loaded by kernel, later on, these files will be needed by the kernel and must be placed to the filesystem..
#> ./makecustom modules
INSTALLING KERNEL TO SOURCE FILESYSTEM
The kernel image must be included to filesystem, the buildroot itself had a generic prototype for filesystem at "buildroot-2009.02/target/generic/target_skeleton" and the other produced by buildroot at "buildroot-2009.02/project_build_i686/uclibc/root" . The kernel will be located at /boot directory.
#>mkdir
#>cp
#>mkdir
#>cp
INSTALLING MODULES TO SOURCE FILESYSTEM
To install kernel modules, go to linux kernel diretory, for simplification i write these script bellow
#> cd linux-2.6.21.5
#> vi Install_modules
press "i" to start inserting text, type in word below:
export PATH=$PATH:
make modules_install ARCH=i386 CROSS_COMPILE=i686-linux-uclibc- INSTALL_MOD_PATH=
make modules_install ARCH=i386 CROSS_COMPILE=i686-linux-uclibc- INSTALL_MOD_PATH=
type in ":" followed by "wq" to write and quit vi editor.
change the mode to executables ones
change the mode to executables ones
#> chmod a+x Install_modules
Run the script
#> ./Install_modules
These will install modules needed by the kernel to lib/modules/ directory.
FINALIZING SOURCE FILESYSTEM
menu.lst for the grub
Lets create a list of menu that will be loaded by the grub loader. At the buildroot directory, type in command lines below:
#>vi menu.lst
press "i" to start edit, type in lines below
default 0
timeout 8
title Alix3d2 embedded linux Console
root (hd0,0)
kernel /boot/bzImage root=/dev/hda1 rw console=ttyS0,38400,8,n,1
title Alix3d2 embedded linux
root (hd0,0)
kernel /boot/bzImage root=/dev/hda1 rw
press ":" followed by "wq"
copy thoes files to root/boot/grub directory, both to the target_skeleton and at the project_build_i686 directory. But first we need to create the grub directory at root/boot/ directory at the source of the filesystem.
#> mkdir
#> cp menu.lst
#> cp menu.lst project_build_i686/uclibc/root/boot/grub/.
Modified inittab to enable serial comm as main console
Since Alix3d2 do not had a graphics adapter, then we had to tell the kernel to use the ttyS0 as main console. Beside at the option on the kernel command line that inserted on the grub menu, we also need to enable it via inittab at root/etc/ directory.
#> cd buildroot-2009.02
# Put a getty on the serial port
#ttyS0::respawn:/sbin/getty -L ttyS0 115200 vt100
edit it into
# Put a getty on the serial port
ttyS0::respawn:/sbin/getty -L ttyS0 38400 vt100
#> cp
Re-make the targe file system
After above modification were done, we need to remake the target file system, simply type in "make" at the buildroot-2009.02/ directory. The result binaries/uclibc/rootfs.i686.ext2 are now ready to be written to compact flash.
MOUNTING FILESYSTEM IMAGE TO COMPACT FLASH
Insert the compact flash using USB card reader. Say the Card reader detected on /dev/sdc.
First thing todo is make a partition on it. You may use fdisk or cfdisk, i prefer cfdisk cause this had a better user interface. first you must login as root.
First thing todo is make a partition on it. You may use fdisk or cfdisk, i prefer cfdisk cause this had a better user interface. first you must login as root.
#> su
#> cfdisk /dev/sdc
erase any partition, write it. Create new primary linux ext2 partition marked bootable, then write it. The final result should look like this:

quit cf disk and go to image filesystem directory.
#> cd buildroot-2009.02/binaries/uclibc/
#> mkdir 1
#> mkdir 2
mount our image to 1/ directory and compact flash to 2/
#> mount rootfs.i686.ext2 -o loop 1
#> mount /dev/sdc1 2
copy recrusively by retaining files ownership from 1 to 2
#> cp -ar 1/* 2/.
#> sync
You may check the copied files by at directory 2/ by "ls" command.
unmount both device
#> umount 1
#> umount 2
Now we had compact flash formated in ext2 marked as bootable whith filesystem files written on it. Final step is to make the compact flash bootable.
I try over and over using grub from the PC host, but always returned failure. I still don't know why, but so far i find out that the grub in the host were created only to configure herself. Gues better way is to follow my experience on making the compact flash bootable by below step.
MAKING COMPACT FLASH BOOTABLE
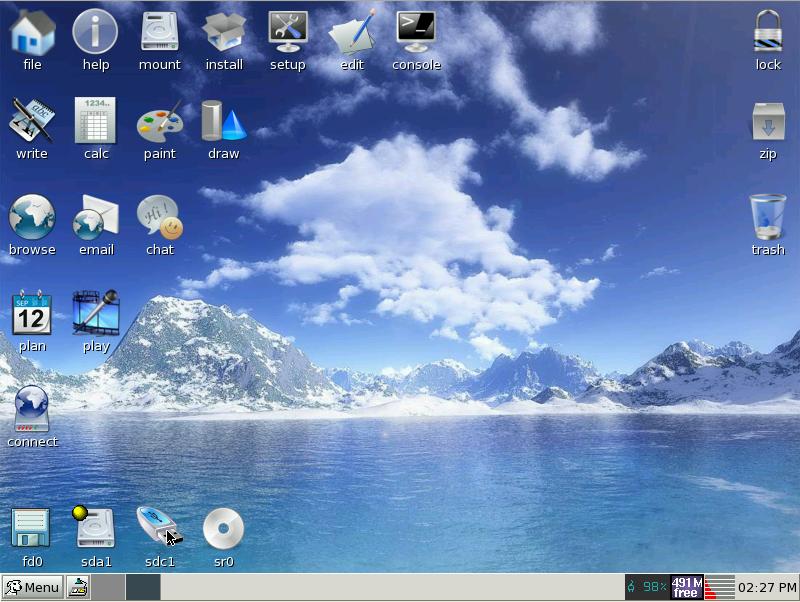
Turn off the PC host with the compact flash still plug in the USB cord, insert the puppy linux live cd and run it. The puppy will configure herself and start to show it x windows whith drive detected shown at the bottom of the desktop.
lets install the grub using grub tools from the start menu.
 Use expert mode
 To start select "begin" -> clik "ok" -> select "standard" for grub dispay menu.
 select "root" -> click "ok" fill in the device by detected driver ones, in this case "/dev/sdc1"
select "linux" add linux partition, check the "dev/sdc1" uncheck others

for the rest of the wizard just click "ok". Last process with grub from start menu were install the grub itself.


The grub were installed on our compact flash succesfully, but we have not finished yet, since the master boot record must be conected to boot partition. To do this run the console and type in the command "grub" do as captured session below:
 #> grub
grub> device (hd0) /dev/sdc
grub> root (hd0,0)
grub> kernel /boot/bzImage
grub> rootnoverify (hd0,0)
grub> makeactive
grub> chainloader +1
grub> setup (hd0)
grub> quit
#>
The major concern is if the command "chainloader +1" returned error, then the first step that is configuring grub via start menu has failed to install grub on the partition. You may had to repeat from the first grub process.
Now we had pointed MBR to grub at partition 1, but the last thing because the grub had beed reinstall here, the menu.lst made by ours will be overide by grub config.
Mount the compact flash by clicking its icon until the exlporer show the folder content.
Remove "menu.lst" at "/boot/grub/" and rename "menu.lst.old.xxx" to "menu.lst". You may use the explorer to do it or by command line as below.
#> cd /mnt/sdc1/boot/grub
#> mv menu.lst.old.xxx menu.lst
 Unmount /dev/sdc1 and turn off the PC host.
Now put the compact fash to ALIX3D2 Board, you may now test your running linux at the board for the first time.
RUNING EMBEDDED LINUX ON ALIX3D2 BOARD
Prepare your alix board firmly, place the compact flash to its slot, plug the serial cable to your PC


in my application i run hyperterminal for console application with the setting using baudrate 38400, 8 bit data no parity, 1stp bit and no flow control.


in my application i run hyperterminal for console application with the setting using baudrate 38400, 8 bit data no parity, 1stp bit and no flow control.

Now plug the power cord.

 Captured text show as follow:
PC Engines ALIX.3 v0.99
640 KB Base Memory
15360
31744
48128
64512
80896
97280
113664
130048 KB Extended Memory
01F0 Master 848A CF Card
Phys C/H/S 1991/16/63 Log C/H/S 995/32/63
GRUB Loading stage1.5.
GRUB loading, please wait...
Linux version 2.6.21.5 (huntu2@linux-h53q) (gcc version 4.2.4) #4 SMP Sat Jul 3 14:27:17 WIT 2010
BIOS-provided physical RAM map:
sanitize start
sanitize end
copy_e820_map() start: 0000000000000000 size: 00000000000a0000 end: 00000000000a0000 type: 1
copy_e820_map() type is E820_RAM
copy_e820_map() start: 00000000000f0000 size: 0000000000010000 end: 0000000000100000 type: 2
copy_e820_map() start: 0000000000100000 size: 0000000007f00000 end: 0000000008000000 type: 1
copy_e820_map() type is E820_RAM
copy_e820_map() start: 00000000fff00000 size: 0000000000100000 end: 0000000100000000 type: 2
BIOS-e820: 0000000000000000 - 00000000000a0000 (usable)
BIOS-e820: 00000000000f0000 - 0000000000100000 (reserved)
BIOS-e820: 0000000000100000 - 0000000008000000 (usable)
BIOS-e820: 00000000fff00000 - 0000000100000000 (reserved)
0MB HIGHMEM available.
128MB LOWMEM available.
Zone PFN ranges:
DMA 0 -> 4096
Normal 4096 -> 32768
HighMem 32768 -> 32768
early_node_map[1] active PFN ranges
0: 0 -> 32768
DMI not present or invalid.
Using APIC driver default
Allocating PCI resources starting at 10000000 (gap: 08000000:f7f00000)
Built 1 zonelists. Total pages: 32512
Kernel command line: root=/dev/hda1 rw console=ttyS0,38400,8,n,1
No local APIC present or hardware disabled
Initializing CPU#0
PID hash table entries: 512 (order: 9, 2048 bytes)
Detected 431.649 MHz processor.
Console: colour dummy device 80x25
Dentry cache hash table entries: 16384 (order: 4, 65536 bytes)
Inode-cache hash table entries: 8192 (order: 3, 32768 bytes)
Memory: 124388k/131072k available (2875k kernel code, 6192k reserved, 1379k data, 248k init, 0k highmem)
virtual kernel memory layout:
fixmap : 0xffe1b000 - 0xfffff000 (1936 kB)
pkmap : 0xff800000 - 0xffc00000 (4096 kB)
vmalloc : 0xc8800000 - 0xff7fe000 ( 879 MB)
lowmem : 0xc0000000 - 0xc8000000 ( 128 MB)
.init : 0xc052f000 - 0xc056d000 ( 248 kB)
.data : 0xc03cefdb - 0xc0527d7c (1379 kB)
.text : 0xc0100000 - 0xc03cefdb (2875 kB)
Checking if this processor honours the WP bit even in supervisor mode... Ok.
Calibrating delay using timer specific routine.. 864.70 BogoMIPS (lpj=1729412)
Mount-cache hash table entries: 512
CPU: L1 I Cache: 64K (32 bytes/line), D cache 64K (32 bytes/line)
CPU: L2 Cache: 128K (32 bytes/line)
Compat vDSO mapped to ffffe000.
Checking 'hlt' instruction... OK.
SMP alternatives: switching to UP code
Freeing SMP alternatives: 18k freed
CPU0: AMD Geode(TM) Integrated Processor by AMD PCS stepping 02
SMP motherboard not detected.
Local APIC not detected. Using dummy APIC emulation.
Brought up 1 CPUs
NET: Registered protocol family 16
PCI: PCI BIOS revision 2.10 entry at 0xfcd03, last bus=0
PCI: Using configuration type 1
Setting up standard PCI resources
SCSI subsystem initialized
usbcore: registered new interface driver usbfs
usbcore: registered new interface driver hub
usbcore: registered new device driver usb
PCI: Probing PCI hardware
Time: tsc clocksource has been installed.
Switched to high resolution mode on CPU 0
NET: Registered protocol family 2
IP route cache hash table entries: 1024 (order: 0, 4096 bytes)
TCP established hash table entries: 4096 (order: 3, 49152 bytes)
TCP bind hash table entries: 4096 (order: 3, 32768 bytes)
TCP: Hash tables configured (established 4096 bind 4096)
TCP reno registered
microcode: CPU0 not a capable Intel processor
IA-32 Microcode Update Driver: v1.14a
scx200: NatSemi SCx200 Driver
Total HugeTLB memory allocated, 0
Installing knfsd (copyright (C) 1996 okir@monad.swb.de).
io scheduler noop registered
io scheduler anticipatory registered (default)
io scheduler deadline registered
io scheduler cfq registered
Real Time Clock Driver v1.12ac
AMD Geode RNG detected
Linux agpgart interface v0.102 (c) Dave Jones
Hangcheck: starting hangcheck timer 0.9.0 (tick is 180 seconds, margin is 60 seconds).
Hangcheck: Using get_cycles().
Serial: 8250/16550 driver $Revision: 1.90 $ 4 ports, IRQ sharing disabled
serial8250: ttyS0 at I/O 0x3f8 (irq = 4) is a 16550A
floppy0: no floppy controllers found
RAMDISK driver initialized: 16 RAM disks of 4096K size 1024 blocksize
loop: loaded (max 8 devices)
Intel(R) PRO/1000 Network Driver - version 7.3.20-k2
Copyright (c) 1999-2006 Intel Corporation.
e100: Intel(R) PRO/100 Network Driver, 3.5.17-k2-NAPI
e100: Copyright(c) 1999-2006 Intel Corporation
via-rhine.c:v1.10-LK1.4.3 2007-03-06 Written by Donald Becker
eth0: VIA Rhine III (Management Adapter) at 0x11000, 00:0d:b9:16:7f:e4, IRQ 10.
eth0: MII PHY found at address 1, status 0x7849 advertising 05e1 Link 0000.
forcedeth.c: Reverse Engineered nForce ethernet driver. Version 0.60.
netconsole: not configured, aborting
Uniform Multi-Platform E-IDE driver Revision: 7.00alpha2
ide: Assuming 33MHz system bus speed for PIO modes; override with idebus=xx
AMD5536: IDE controller at PCI slot 0000:00:0f.2
AMD5536: chipset revision 1
AMD5536: not 100% native mode: will probe irqs later
AMD5536: 0000:00:0f.2 (rev 01) UDMA100 controller
ide0: BM-DMA at 0xff00-0xff07, BIOS settings: hda:DMA, hdb:pio
hda: CF Card, CFA DISK drive
ide0 at 0x1f0-0x1f7,0x3f6 on irq 14
hda: max request size: 128KiB
hda: 2006928 sectors (1027 MB) w/1KiB Cache, CHS=1991/16/63, UDMA(33)
hda: hda1
3ware Storage Controller device driver for Linux v1.26.02.002.
Fusion MPT base driver 3.04.04
Copyright (c) 1999-2007 LSI Logic Corporation
Fusion MPT SPI Host driver 3.04.04
ieee1394: raw1394: /dev/raw1394 device initialized
usbmon: debugfs is not available
ehci_hcd 0000:00:0f.5: EHCI Host Controller
ehci_hcd 0000:00:0f.5: new USB bus registered, assigned bus number 1
ehci_hcd 0000:00:0f.5: irq 15, io mem 0xefffd000
ehci_hcd 0000:00:0f.5: USB 2.0 started, EHCI 1.00, driver 10 Dec 2004
usb usb1: configuration #1 chosen from 1 choice
hub 1-0:1.0: USB hub found
hub 1-0:1.0: 4 ports detected
ohci_hcd 0000:00:0f.4: OHCI Host Controller
ohci_hcd 0000:00:0f.4: new USB bus registered, assigned bus number 2
ohci_hcd 0000:00:0f.4: irq 15, io mem 0xefffe000
usb usb2: configuration #1 chosen from 1 choice
hub 2-0:1.0: USB hub found
hub 2-0:1.0: 4 ports detected
USB Universal Host Controller Interface driver v3.0
usbcore: registered new interface driver usblp
drivers/usb/class/usblp.c: v0.13: USB Printer Device Class driver
Initializing USB Mass Storage driver...
usbcore: registered new interface driver usb-storage
USB Mass Storage support registered.
usbcore: registered new interface driver usbhid
drivers/usb/input/hid-core.c: v2.6:USB HID core driver
i8042.c: No controller found.
mice: PS/2 mouse device common for all mice
device-mapper: ioctl: 4.11.0-ioctl (2006-10-12) initialised: dm-devel@redhat.com
geode-aes: GEODE AES engine enabled.
oprofile: using timer interrupt.
TCP cubic registered
NET: Registered protocol family 1
NET: Registered protocol family 10
IPv6 over IPv4 tunneling driver
NET: Registered protocol family 17
Using IPI Shortcut mode
EXT2-fs warning: mounting unchecked fs, running e2fsck is recommended
VFS: Mounted root (ext2 filesystem).
Freeing unused kernel memory: 248k freed
Initializing random number generator... done.
Starting network...
ip: RTNETLINK answers: File exists
Welcome to Buildroot
uclibc login:
The default login were root with no password since it was not configured yet. Congratulations now you had run your linux on ALIX3D board for the first time. Later you may add your own apllication, reconfiguring component to be installed and so much more.
You can download my image resulted on compact flash here, use winimage to write it to the compact flash.
You can download my image resulted on compact flash here, use winimage to write it to the compact flash.
Have fun and feel free to contact me if any question come up.
---------------------
huntu2 100709
---------------------
No comments:
Post a Comment