Wednesday, October 18, 2023

copying linux system and boot

mounting and copying file

mkdir s     (for source).

mkdir d     (for destination)

sudo mount /dev/sda1  s     (mounted file system to be copied to)

mount /dev/sdb1 d              (destination device formatted ext4)

sudo cp -avrf s/* d/.

....    (bunch of message copy process)

sudo umount s    (unmount source device/running OS to has been copied)


setting up boot on destination device

sudo mount proc d/proc/ -t proc
sudo mount sys d/sys/ -t sysfs
sudo mount -o bind /dev/ d/dev/
sudo chroot d 

find device destination uuid (sdb1)

ls -al /dev/disk/by-uuid

drwxr-xr-x 2 root root 140 Oct 19 10:50 .
drwxr-xr-x 7 root root 140 Oct 19 09:49 ..
lrwxrwxrwx 1 root root  10 Oct 19 10:50 076e1fc2-c344-49ea-95de-e1b0d3f77be5 ->
../../sdb4
lrwxrwxrwx 1 root root  10 Oct 19 09:55 1712071f-7899-4496-8a5e-881821578813 ->
../../sda1
lrwxrwxrwx 1 root root  10 Oct 19 09:49 28944C55944C2820 -> ../../sdb2
lrwxrwxrwx 1 root root  10 Oct 19 09:49 5e24b64a-1d70-46f3-b820-70fd3e8f2d4e ->
../../sdb3
lrwxrwxrwx 1 root root  10 Oct 19 09:49 84DE5634DE561EAC -> ../../sdb1

edit /etc/fstab replace the root file system UUID with UUID new device  
 
vi /etc/fstab
 
#### Static Filesystem Table File
proc    /proc   proc    defaults        0       0
# /dev/sdd1
#UUID=1712071f-7899-4496-8a5e-881821578813      /       ext4    rw,errors=remoun
t-ro    0       1
# /dev/sdb1
UUID=
84DE5634DE561EAC       /       ext4    rw,errors=remoun
t-ro    0       1

Upgrade and install grub on destination device

update-grub

grub-install /dev/sdb

exit

sudo umount d/proc

sudo umount d/sys

sudo umount d/dev

sudo umount d/


Done! start boot on new device


boot serial terminal

sudo vi /etc/default/grub

 # If you change this file, run 'update-grub' afterwards to update
# /boot/grub/grub.cfg.
# For full documentation of the options in this file, see:
#   info -f grub -n 'Simple configuration'

GRUB_DEFAULT=0
GRUB_TIMEOUT=5
GRUB_DISTRIBUTOR=`lsb_release -i -s 2> /dev/null || echo Debian`
#GRUB_CMDLINE_LINUX_DEFAULT="quiet splash"
GRUB_CMDLINE_LINUX_DEFAULT=""
#GRUB_CMDLINE_LINUX=""
GRUB_CMDLINE_LINUX="text console=tty0 console=ttyS0,115200n8"

# Uncomment to enable BadRAM filtering, modify to suit your needs
# This works with Linux (no patch required) and with any kernel that obtains
# the memory map information from GRUB (GNU Mach, kernel of FreeBSD ...)
#GRUB_BADRAM="0x01234567,0xfefefefe,0x89abcdef,0xefefefef"

# Uncomment to disable graphical terminal (grub-pc only)
GRUB_TERMINAL=console
#GRUB_TERMINAL=serial
#GRUB_SERIAL_COMMAND=serial --speed=115200 --unit=0 --word=8 --parity=no --stop=1

# The resolution used on graphical terminal
# note that you can use only modes which your graphic card supports via VBE
# you can see them in real GRUB with the command `vbeinfo'
#GRUB_GFXMODE=640x480

# Uncomment if you don't want GRUB to pass "root=UUID=xxx" parameter to Linux
#GRUB_DISABLE_LINUX_UUID=true

# Uncomment to disable generation of recovery mode menu entries
#GRUB_DISABLE_RECOVERY="true"

# Uncomment to get a beep at grub start
#GRUB_INIT_TUNE="480 440 1"

sudo update-grub

to set piority to next os (win 7) the linux always occupy 2 lines. then the optian will be the third from zero wich is default "2"

sudo vi /boot/grub/grub.cfg

...

if [ "${next_entry}" ] ; then
   set default="${next_entry}"
   set next_entry=
   save_env next_entry
   set boot_once=true
else
   set default="2"
fi


boot console

to boot in concole text mode: 
sudo systemctl set-default multi-user.target
revert to normal 
sudo systemctl get-default


apt

 apt-get update --allow-releaseinfo-change


W: Failed to fetch https://deb.debian.org/debian/dists/buster-backports/InRelease  The following signatures couldn't be verified because the public key is not available: NO_PUBKEY 0E98404D386FA1D9 NO_PUBKEY 6ED0E7B82643E131

sudo gpg --keyserver pgp.mit.edu --recv-keys 0E98404D386FA1D9 6ED0E7B82643E131 0E98404D386FA1D9 6ED0E7B82643E131

gpg --armor --export DC30D7C23CBBABEE | sudo apt-key add -

sudo apt intsall debian-keyring debian-archive-keyring

Sunday, October 15, 2023

create rc.local on systemd

 vi /etc/systemd/system/rc-local.service

 [Unit]
Description=/etc/rc.local
ConditionPathExists=/etc/rc.local

[Service]
#Type=forking
Type=idle
ExecStart=/etc/rc.local start
TimeoutSec=0
StandardOutput=tty
RemainAfterExit=yes
SysVStartPriority=99

[Install]
WantedBy=multi-user.target

vi /etc/rc.local

#!/bin/sh -e
#
# rc.local
#
# This script is executed at the end of each multiuser runlevel.
# Make sure that the script will "exit 0" on success or any other
# value on error.
#
# In order to enable or disable this script just change the execution
# bits.
#
# By default this script does nothing.

exit 0

chmod a+x /etc/rc.local

 sudo systemctl enable rc-local.service

done!


Thursday, October 12, 2023

samba share folder

 To share samba (windows share) with all permisson (on debian jessie) add following lines to  /etc/samba/smb.conf

...

[<name media>]
 path = <path to folder>
 public = yes
 writable = yes
 comment = smb share
 printable = no
 guest ok = yes
 read only = no
 directory mask = 0775

example:

vi /etc/samba/smb.conf

.....

[media]
 path = /media
 public = yes
 writable = yes
 comment = smb share
 printable = no
 guest ok = yes
 read only = no
 directory mask = 0775


to add password simple:

[media]
 path = /media
 public = yes
 writable = yes
 comment = smb share
 printable = no
 guest ok = no
 read only = no
 directory mask = 0775
 username = igunos

multiple user  username = igunos, jony, antony

then add password

sudo smbpasswd -a igunos

....<your passwd>


client:

mount via cifs-utils

sudo mount -t cifs //10.1.1.60/media/ /mnt -o username=<your_username>,password=<your_password


nfs share folder

To share nfs with all permission add these line to /etc/exports (on debian jesssie)

<folder> <ip/mask>  (rw,sync,no_subtree_check,no_all_squash,no_root_squash) 

to be accessedon multiple subnet

<folder> <ip/mask>  (rw,sync,no_subtree_check,no_all_squash,no_root_squash)  <ip2/mask> (rw,sync,no_subtree_check,no_all_squash,no_root_squash) 


examples:

 vi /etc/exports

....

 /media/data 10.1.1.0/255.255.255.0(rw,sync,no_subtree_check,no_all_squash,no_root_squash) 

/media/maindata 10.1.1.0/255.255.255.0(rw,sync,no_subtree_check,no_all_squash,no_root_squash) 10.1.2.0/255.255.255.0(rw,sync,no_subtree_check,no_all_squash,no_root_squash)

client

mount  -t nfs 10.1.1.60:/media/<dir> /mnt 

if passwored

mount  -t nfs 10.1.1.60:/media/<dir> /mnt -o username=<user>,password=<pass>


Wednesday, October 5, 2022

Public Announcement system using Asterisk

I got a task to build a Public Announcement system with select able address, single or multi destination. Here I'm using asterisk void server using few banana-pi board that i got from rejected defect board on my last project, but still functional.


Sunday, April 17, 2016

Github Cheatsheet

Set global users

$ git config --global user.name "John Doe"
$ git config --global user.email johndoe@example.com

create a new repository on the command line

echo "# apcombo" >> README.md
git init
git add README.md
git commit -m "first commit"
git remote add origin https://github.com/huntu2/apcombo.git
git push -u origin master

or push an existing repository from the command line

git remote add origin https://github.com/huntu2/apcombo.git
git push -u origin master

or import code from another repository

You can initialize this repository with code from a Subversion, Mercurial, or TFS project.

Saturday, February 13, 2016

Applying LCD Engine JX-V2959 V2.1

Recently I bought an Universal LCD Engine for my broken Dell monitor. The reason I bought it because it was cheap, the total price with shipping around 150.000 IDR from local online store.
 

The LCD engine type is JX-29-GS shown on the sticker, on the board it says JX-2959-GS V2.1. The first thing is to attach the LVDS cable connection. The LCD display type is MX150NX07. 
For reference you can follow description from https://sites.google.com/site/lcd4hobby/home .
Re-arrange the LVDS cable according to LCD based on the pinout shown in datasheets.

Friday, October 30, 2015

MT7601 on Raspberry Pi

Here's how to cross compile driver for Mediatek MT7601 based wifi dongle.

Before this, you need to compile your own raspibian kernel, see my old post: http://igunosystem.blogspot.co.id/2014/03/step-by-step-building-raspibian-on.html
After above process is OK, You'll have compiled kernel source and working root file system with working chroot (using qemu-arm-static) for raspberry pi board on your Desktop PC.

mt7601
download source:
https://github.com/porjo/mt7601/archive/master.zip
or
git clone https://github.com/porjo/mt7601.git

RTL8188eu on Raspberry pi

Here's how to cross compile driver for RTL8188eu based wifi dongle

Before this, you need to compile your own raspibian kernel, see my old post:
http://igunosystem.blogspot.co.id/2014/03/step-by-step-building-raspibian-on.html
After above process is OK, You'll have compiled kernel source and working root file system with working chroot (using qemu-arm-static) for raspberry pi board on your Desktop PC.

download source:
https://github.com/lwfinger/rtl8188eu/archive/master.zip
or
git clone https://github.com/lwfinger/rtl8188eu

Wednesday, October 21, 2015

WVDIAL Keep Alive

Here's a script to make the wvdial keep alive. Similar to umtskeeper that use sakis3g, this one can be use for some modem or internet provider that sakis3g won't connect. let's call this script as runwvd.
runwvd: (moved to github)

https://github.com/huntu2/wvdial-keepalive/blob/master/runwvd

make the script executable
chmod a+x runwvd

change the MODEM_NAME to your modem vendor that shown by lsusb


To start do following:
sudo ./runwvd start

To stop:
sudo ./runwvd stop

To view progres:
tail -f /tmp/runwvd.log

Prerequisites:
Before above script able to run properly, you'll need package:
sudo apt-get install wvdial usb-modeswitch fping ppp nohup usbutils

configure wvdial.conf by executing
sudo wvdialconf

copy the result at /etc/wvdial.conf and place it in the same folder as this script. Complete the Phone number username and password, something like this
wvdial.conf:
#-----------------------------------------------
[Dialer Defaults]
Init1 = ATZ
Init2 = ATQ0 V1 E1 S0=0 &C1 &D2
Modem Type = Analog Modem
ISDN = 0
Modem = /dev/ttyUSB0
Baud = 9600
Phone = *99#
Username = '0'
Password = '0'
#------------------------------------------------


the '0' means no username and password supplied.

You also need resetusb, here's the source:
resetusb.c
#----------------------------------------------------
#include <stdio.h>
#include <fcntl.h>
#include <errno.h>
#include <sys/ioctl.h>
#include <linux/usbdevice_fs.h>
void main(int argc, char **argv)
{
    const char *filename;
    int fd;
    filename = argv[1];
    fd = open(filename, O_WRONLY);
    ioctl(fd, USBDEVFS_RESET, 0);
    close(fd);
    return;
}
#----------------------------------------------------

compile it using:
gcc -o resetusb resetusb.c

Brief how it works:

The runwvd start with stamp file (/tmp/.runwvd) to control the loop, if this file gone, the loop will stop and the script terminated. The output process can be shown at /tmp/runwvd.log and the wvdial progress can be monitored from /tmp/wvdial.log.
 

First, it will call wvdial with wvdial.conf at the same folder. Then every SLEEPTIME period (above is 3 second) will regularly check for ppp0 existence and wvdial process. If both is missing, then the script will kill the wvdial and redial again.
 

Second, if first step is passed , the script will try to ping the dns server on peride CHECKTIME x SLEEPTIME, (above every 3x60=3minutes). The IP of the DNS were taken from /etc/resolv.conf resulted by wvdial upon successful connection. The ping loop will try to reach the DNS server for PINGLIMIT times (above is 5) with 1 second delay each. If all fail, then the script will terminate the wvdial and redial again.
 

Third, if the redial process happen more than REDIALIMIT (above is 5 times), then the script will try to reset the 3G modem after the wvdial terminated, and then redial again. This will help to re-register the 3G modem to the mobile network base station.
 

This note was written for my own record continuing previous blog on my homemade 3g router, but this might be useful for others who need it. 
Sorry for the bad blog format due to  my poor knowledge of the HTML and english language.

Sunday, October 18, 2015

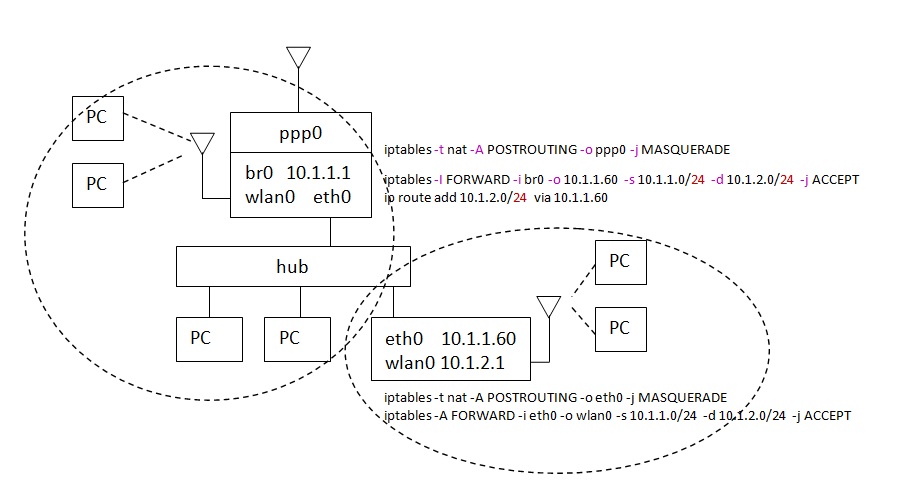
Routing subnet below net


iptables -t nat -A POSTROUTING -o ppp0 -j MASQUERADE

iptables -I FORWARD -i br0 -o 10.1.1.60 -s 10.1.1.0/24 -d 10.1.2.0/24 -j ACCEPT
ip route add 10.1.2.0/24 via 10.1.1.60

iptables -t nat -A POSTROUTING -o eth0 -j MASQUERADE
iptables -A FORWARD -i eth0 -o wlan0 -s 10.1.1.0/24 -d 10.1.2.0/24 -j ACCEPT

Wednesday, September 30, 2015

Sudo no password

all user no password

sudo visudo
..
ALL ALL=(ALL) NOPASSWD:ALL
 
spesific user no password
 
sudo visudo
....
<user> ALL=(ALL) NOPASSWD:ALL

Wednesday, September 2, 2015

Duplicating Raspberry Image The hard Way

Compressed backup system

Insert sdcard containing working raspberry system
says it way detected as /dev/sdc/

copying the partition
sudo sfdisk -d /dev/sdc > partition.layout

mounting the sdcard
sudo mount /dev/sdc2 /mnt
sudo mount /dev/sdc1 /mnt/boot

compressing your system
cd /mnt
sudo tar cjvf /home/user/imagerpi-0000.tar.bz2 *

unmounting sdcard
cd ~
sudo umount /mnt/boot
sudo umount /mnt
unplug your sdcard

Cleanup log file

Simple script to clean up log file
vi cleanlog

#-------------------------------------------------------
#!/bin/bash

# Make sure only root can run our script
if [ "$(id -u)" != "0" ]; then
   echo "$0 must be run as root" 1>&2
   exit 1
fi

if [ "$1" ];then
   LOGDIR=$1
   if [ ! -d "$1" ];then
      echo "$1 not exist"
      exit 0
   fi
else
   LOGDIR="/var/log"
fi

Friday, August 28, 2015

Pretty OSMC

Just download the latest osmc for Raspberry, burn it to sdcard and plug.
Install kore at your android, enable service->webserver->remote http at your osmc,
Huray... i got media centre with remote control :)


The same does with openelec and xbian, it's pretty, and off course available for raspberry pi.